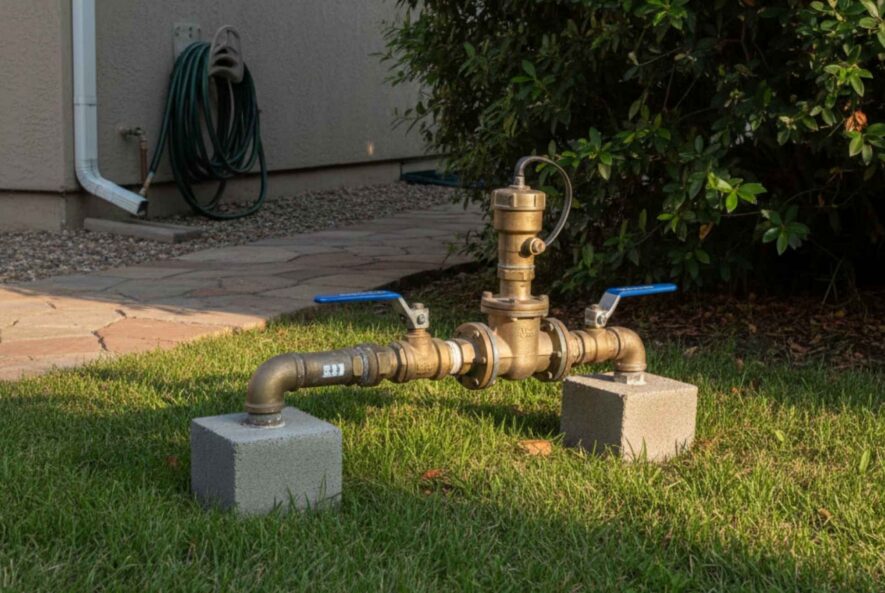
Commercial Plumbing Maintenance: Complete Guide for Facilities
Commercial plumbing maintenance is one of the most important steps in keeping a commercial plumbing system functioning properly, especially in high-traffic environments where plumbing systems support hundreds of building occupants each day. Whether you manage an office, restaurant, multi-family property, retail center, or healthcare facility in Fairfield County, CT, or Westchester County, NY, preventative maintenance is essential. Regular maintenance helps prevent clogged drains, slow drains, pipe leaks, and water pressure issues that disrupt business operations. It also reduces the risk of major repairs, emergency repairs, and health hazards caused by mold growth, hidden leaks, or poor sanitary conditions.
Many commercial buildings rely on a routine maintenance plan to keep hot water flowing, maintain proper drainage, and protect the potable water supply from contamination. Routine inspections help identify problems early, reduce repair costs, and prevent costly repairs that often happen when plumbing issues go unnoticed. A commercial plumbing system is more complex than a residential setup, with multiple floors, heavier water usage, and specialized plumbing fixtures. That makes regular plumbing maintenance essential for preventing water waste, property damage, and plumbing emergencies.
If your commercial facility in Connecticut or Westchester County needs reliable commercial plumbing services, preventative maintenance, or immediate service for plumbing problems, All State Plumbing Pros offers 24/7 licensed support to keep your building’s plumbing system performing safely year-round.
Why Commercial Plumbing Maintenance Matters for Every Facility
Commercial plumbing maintenance protects commercial facilities by reducing health risks, preventing mold growth, and maintaining safe water flow throughout the building. When plumbing systems are not up to date or lack regular inspections, businesses face a much higher chance of costly repairs, water damage, and sewer line backups. Preventing major repairs begins with identifying issues early through routine inspections that look for signs of wear, pipe corrosion, and early signs of plumbing failure.
Commercial plumbing systems endure constant use, especially in buildings where employees and customers rely on restrooms, water heaters, kitchen sinks, floor drains, and specialized fixtures. Without preventative maintenance, water pressure can fluctuate, water bills can increase due to water waste, and slow drainage can develop into full sewer line blockages. In Connecticut and New York, seasonal temperature shifts make plumbing maintenance even more important. Freeze-thaw cycles stress pipes and increase the risk of pipe leaks, while summer humidity can lead to corrosion and unhealthy conditions.
Regular plumbing maintenance also supports compliance. Backflow prevention devices, water heaters, sump pumps, and other key components must meet state and local standards. A failure in these systems does more than disrupt business operations; it can lead to health hazards and potential closures. Commercial plumbing tips that emphasize early detection and proactive service help protect your investment, maintain a healthy environment, and reduce long-term repair costs.
Commercial Plumbing Maintenance Schedule (Daily to Annual)
Every commercial building benefits from a structured maintenance schedule. Commercial plumbing maintenance involves daily checks, weekly cleaning, monthly evaluations, quarterly inspections, and annual system reviews. This routine maintenance helps identify problems early, maintain efficient water flow, and avoid costly repairs.
Daily Checks Building Staff Should Perform
Daily checks help building occupants catch plumbing issues early before they develop into major repairs. These tasks require minimal training but provide valuable insights into the building’s plumbing system. Early signs of plumbing problems, such as moisture, strange odors, or slow drainage, often start small but can escalate quickly.
Daily tasks generally include:
- Checking for visible leaks around plumbing valves, pipes, and fixtures
- Observing slow drains or standing water may indicate clogged drains
- Listening for unusual noises, which may signal pressure issues or pipe blockages
- Ensuring water flow from faucets and shower heads remains steady
- Inspecting floor drains for proper drainage and confirming no odors from sewer lines
- Looking for mold growth or damp spots that could signal hidden leaks
Weekly Plumbing Maintenance Tasks
Weekly maintenance focuses on keeping fixtures and components clean, which reduces buildup, improves water flow, and prevents clogs. These steps also help maintain safe water temperature and prevent stress on water heaters.
Weekly tasks include:
- Cleaning faucet aerators and shower heads to remove mineral debris
- Flushing slow drains to support proper drainage
- Checking temperature and water heaters for consistent hot water
- Inspecting exposed pipes for early signs of corrosion
- Looking for water waste caused by dripping fixtures or leaking valves
Monthly Professional-Level Tasks
Monthly maintenance involves deeper inspections that help prevent plumbing emergencies. These tasks should be part of a routine maintenance plan, handled by trained maintenance staff or a licensed plumber.
Monthly inspections may include:
- Testing water pressure regulators to ensure stable water pressure
- Exercising plumbing valves to reduce rust and maintain smooth operation
- Documenting water usage patterns and checking for spikes that suggest hidden leaks
- Inspecting plumbing fixtures for loose fittings, corrosion, or signs of wear
- Testing backflow prevention devices to protect the potable water supply
- Performing targeted drain cleaning to prevent clogged drains in commercial settings
If your facility is seeing repeated slow drainage, pressure fluctuations, or signs of wear, scheduling a monthly or quarterly inspection with All State Plumbing Pros helps prevent costly repairs and keeps your plumbing system functioning properly.
Quarterly Inspections by a Licensed Commercial Plumber
Quarterly inspections allow professionals to evaluate deeper components of commercial plumbing systems using specialized tools such as acoustic sensors and camera equipment. These inspections are essential for identifying issues early, preventing major repairs, and ensuring the system stays compliant with local codes.
Quarterly tasks include:
- Camera inspections of sewer lines to identify blockages or damage
- Testing water heaters, including temperature consistency and sediment buildup
- Cleaning grease traps for restaurants and food service facilities
- Identifying hidden leaks behind walls or beneath floors
- Checking sump pumps, drainage lines, and stormwater components for proper functionality
Annual Deep Inspection and Compliance Review
Annual inspections include a full review of the building’s plumbing needs, safety requirements, and compliance standards. These checks prevent health risks, reduce business disruptions, and ensure all plumbing systems remain functioning properly.
Annual maintenance may include:
- Full inspection of plumbing fixtures, valves, and key components
- Backflow prevention and certification
- Reviewing water temperature regulation and water heater performance
- Inspecting sewer lines and floor drains for blockages
- Updating documentation for compliance with CT and NY regulations
- Evaluating sump pumps and drainage systems for commercial construction updates
Commercial Plumbing Maintenance Schedule Overview
| Frequency | Tasks | Who Performs It | Issues Prevented |
| Daily | Leak and odor checks, drainage monitoring | Building staff | Mold growth, hidden leaks |
| Weekly | Fixture cleaning, drain flushing | Staff | Slow drains, minor buildup |
| Monthly | Valve exercises, drain cleaning | Staff/Plumber | Pipe corrosion, clogged drains |
| Quarterly | Camera inspections, grease trap service | Licensed plumber | Sewer backups, major repairs |
| Annual | Backflow testing, full system review | Licensed plumber | Health hazards, compliance issues |
Common Commercial Plumbing Problems and How to Prevent Them
Commercial plumbing systems face frequent strain, making plumbing problems common in commercial facilities. Preventing major repairs requires proactive inspections and awareness of how various components behave. Clogged drains, slow drainage, pipe leaks, and water pressure fluctuations are often the first indicators that something is wrong.
Common plumbing issues include:
- Clogged drains and sewer lines: Caused by grease, debris, minerals, or improper disposal
- Pipe corrosion: A major cause of leaks and water contamination in older buildings
- Slow drains: Often the result of buildup deep in the plumbing systems
- Low or high water pressure: Caused by failing valves or supply line obstructions
- Water heater problems: Sediment buildup reduces efficiency and limits the hot water supply
- Backflow hazards: A failure in backflow prevention devices allows contaminated water into the potable water supply
- Grease trap issues: Common in restaurants where proper drainage depends on clean traps
- Hidden leaks: Structural damage, mold growth, and high water bills often point to leaks behind walls
Commercial buildings in Connecticut and Westchester County often deal with mineral-rich water that increases corrosion and worsens slow drainage. Preventing costly repairs requires ongoing attention to water flow, pressure levels, and signs of plumbing problems.
Backflow Prevention and Why It’s Required in Commercial Buildings
Backflow prevention devices protect the potable water supply by ensuring water flows in the correct direction at all times. Commercial buildings are required to use properly functioning backflow prevention devices because cross-connection failures can introduce contaminants into the water supply.
Backflow incidents pose health hazards and can lead to serious violations during inspections. Proper drainage, safe water supply, and compliance with CT and NY regulations all depend on reliable backflow prevention. Annual testing, professional installation, and timely replacements help maintain a healthy environment and ensure business operations remain uninterrupted.
Facilities with multiple floors, complex plumbing layouts, or high-demand fixtures benefit greatly from scheduled backflow testing performed by licensed plumbers.
How Preventive Maintenance Reduces Business Downtime and Repair Costs
Preventive maintenance protects commercial plumbing systems by reducing the likelihood of plumbing emergencies. By identifying issues early and performing regular cleaning, routine inspections, and valve adjustments, businesses avoid the steep repair costs associated with pipe leaks, sewer backups, and water heater failures.
A facility that monitors water usage, tests pressure regularly, and services water heaters annually will remain more efficient and experience fewer disruptions. Restaurants, for example, depend on properly functioning grease traps and floor drains to stay operational. When these components fail, business operations can halt for hours.
For ongoing maintenance programs tailored to your building’s plumbing system, All State Plumbing Pros offers preventative maintenance plans that protect your property and reduce repair costs.
Commercial Plumbing Maintenance for Specific Facility Types
Each commercial setting has unique needs depending on its structure, number of occupants, and daily water usage.
Restaurants and Food Service Facilities
Restaurants rely on consistent water flow, grease traps, and hot water access. Clogged drains, sewer line backups, and floor drain failures are common due to food debris, oil, and high-volume use. Preventive maintenance keeps grease traps functioning properly and prevents health hazards.
Office Buildings and Corporate Facilities
Office buildings often have multiple floors and heavy restroom usage. Hidden leaks, pressure inconsistencies, and slow drains can disrupt work environments and cause property damage if not detected early. Routine maintenance helps identify problems early and ensures sanitary conditions.
Retail Stores and Shopping Centers
Retail buildings rely on customer-facing restrooms and must maintain sanitary conditions to meet customer expectations. Slow drainage, leaking fixtures, and poor water temperature control are common concerns.
Healthcare Facilities and Clinics
Healthcare facilities require precise water temperature control, sanitation, and functioning water heaters. Proper drainage, contamination prevention, and backflow devices are critical for safety.
Apartment Complexes & Multi-Family Buildings
Shared sewer lines, sump pumps, and water heaters make multi-family buildings more vulnerable to system-wide plumbing issues. Routine maintenance prevents slow drains, ensures water conservation, and reduces water waste across units.
Professional Maintenance vs. In-House Staff Responsibilities
While building staff can perform daily visual checks, deep inspections require licensed professionals. Commercial plumbing systems involve key components, water heaters, valves, sewer lines, and backflow prevention devices, that must be evaluated by trained plumbers to ensure compliance and functionality.
In-house staff may monitor drainage, clean fixtures, and report early signs of leaks. Licensed plumbers handle:
- Valve and pressure adjustments
- Water heater service
- Sewer line cleaning
- Compliance testing
- Backflow certification
- Major repairs
This combined approach ensures problems are identified early and prevents major repairs that disrupt commercial operations.
Documentation, Compliance, and Inspection Records for CT & NY Facilities
Accurate documentation supports plumbing compliance for commercial buildings. CT and NY require backflow certifications, maintenance logs, water temperature readings, and inspection records. Keeping detailed logs helps identify recurring plumbing issues, track water usage, and avoid compliance violations.
Documentation helps evaluate repair costs, water bills, and necessary upgrades for aging plumbing systems. Facilities that keep maintenance records up to date also pass audits more smoothly, ensuring their building remains safe and code-compliant.
When to Call a Licensed Commercial Plumber in CT or NY
Facility managers should call a licensed commercial plumber when they see persistent slow drainage, recurring clogged drains, fluctuating water pressure, unexplained water waste, leaks, sewer odors, inconsistent hot water, or signs of pipe corrosion. These issues often signal deeper problems within the building’s plumbing system.
Plumbing emergencies require immediate service to prevent property damage, business shutdowns, and health hazards. A licensed plumber can diagnose the root cause and provide compliant repairs quickly.
Conclusion
Commercial plumbing maintenance plays a crucial role in controlling repair costs, preventing plumbing emergencies, and keeping commercial buildings safe. By identifying issues early, maintaining key components, and investing in routine maintenance, facilities across Connecticut and Westchester County can reduce downtime and preserve sanitary conditions. Preventive maintenance also helps avoid costly repairs, ensures compliance, and keeps plumbing systems functioning properly year-round.
If your building is experiencing slow drains, fluctuating water pressure, recurring leaks, or any signs of plumbing wear, don’t wait for a system-wide failure. At All State Plumbing Pros, our licensed commercial plumbers are available 24/7 across Connecticut and New York to keep your facility running safely and efficiently. From preventative commercial plumbing maintenance and system inspections to full repairs and emergency service, contact us today for dependable support you can trust.
FAQs
What does commercial maintenance mean?
Commercial maintenance refers to ongoing inspections, cleaning, testing, and servicing required to keep a commercial plumbing system functioning properly. It includes preventative maintenance tasks such as leak checks, drain cleaning, pressure testing, and backflow inspections. Many commercial facilities in CT and NY schedule regular maintenance to avoid costly repairs and protect business operations.
What is maintenance in plumbing?
Plumbing maintenance includes the routine care needed to prevent clogs, leaks, and system failures. This involves regular cleaning, water pressure checks, inspecting plumbing valves, testing water heaters, and ensuring proper drainage throughout the building. Routine inspections help identify problems early and maintain a sanitary environment.
What does commercial mean in plumbing?
Commercial plumbing refers to the installation, maintenance, and repair of plumbing systems in commercial buildings such as restaurants, offices, shopping centers, and multi-family properties. These plumbing systems are designed to support multiple floors, high water usage, and specialized fixtures. Commercial plumbing services ensure safe water flow, proper drainage, and compliance with state regulations.
What are the duties of a plumber in maintenance?
A maintenance plumber inspects plumbing systems, detects hidden leaks, tests backflow prevention devices, services water heaters, and repairs pipe corrosion to ensure the system remains functioning properly. Their duties also include cleaning sewer lines, checking for early signs of wear, adjusting water pressure, and preventing major repairs. If your business needs ongoing preventative maintenance, you can schedule a commercial plumbing inspection with All State Plumbing Pros.
Sump Pump Maintenance Guide for CT and NY Homeowners
Basements in Connecticut and New York face constant risks from heavy rain, storms, and rising groundwater. When the water level reaches the bottom of the sump pit, the entire system relies on a properly maintained sump pump to begin removing water before it causes flooding or structural damage. (more…)
Complete Home Plumbing Inspection Checklist for 2026
A home plumbing inspection checklist helps homeowners catch leaks, slow drains, water pressure issues, and early damage inside plumbing systems before costly repairs occur. Whether you live in Fairfield County, CT, or Westchester County, NY, a full home plumbing inspection allows you to assess sinks, toilets, pipes, faucets, and valves to ensure everything is functioning properly. (more…)
Average Cost to Replace Water Heater in 2026
The average cost to replace a water heater varies based on the type of system you choose, the installation requirements, and the condition of your current water heater setup. Homeowners across Fairfield County, CT, and Westchester County, NY often need fast answers when they experience leaks, strange noises, sediment buildup, or inconsistent hot water. (more…)
How to Fix a Leaky Faucet: Simple Steps Any Homeowner Can Do
A leaky faucet may start as a small annoyance, but those constant drips add up quickly. Even a slow leaking faucet can waste thousands of gallons each year, raise your water bill, and create moisture damage around your sink, countertop, or bathroom fixtures. For many Connecticut and Westchester County homeowners, learning how to fix a leaky faucet saves time, money, and prevents bigger plumbing issues from developing later.
Most faucet leaks come from worn internal parts, worn-out washers, cracked O-rings, loose faucet handles, corroded valve seats, or failing cartridges inside cartridge faucets. In older homes, compression faucets with two handles for hot and cold water often leak when a rubber washer deteriorates. Newer fixtures like ball faucets or disc faucets also develop leaks when internal components wear down, restricting water flow or allowing water to slip through the faucet spout even when the handles are off.
The good news is that you can often fix a leaky faucet yourself with basic tools, a bit of patience, and the right steps. This guide breaks down the repair process, explains the common causes of faucet leaks, and shows you how to replace internal components safely and correctly. If the leak persists or you notice corrosion, stuck shut-off valves, or cabinet damage, professional help from a licensed plumber is the safest option. All State Plumbing Pros offers full emergency plumbing services across Connecticut and Westchester County.
What Causes a Leaky Faucet?
A leaky faucet happens when water slips past damaged components inside the fixture. Over time, these small internal parts wear down from friction, water pressure, mineral buildup, or repeated use. Identifying the issue helps you determine whether you need a new washer, a replacement cartridge, or deeper service.
Worn-Out Washers and O-Rings
A deteriorated washer or O-ring is one of the most common reasons for a faucet leak. When the seal breaks down, water escapes around the faucet handle or spout. Compression faucets that rely on a rubber washer to stop water flow are especially prone to these problems.
Damaged Cartridges
Many modern faucets use replaceable cartridges to regulate temperature and water flow. When the cartridge wears out, the faucet often drips from the spout. Cartridge faucets may also feel stiff or inconsistent when adjusting hot and cold water.
Corroded Valve Seats
The valve seat sits between the faucet and the spout. Mineral-rich water, common in Connecticut, can cause corrosion, preventing the valve seat from sealing tightly. This leads to leaks at the base of the faucet spout.
High Water Pressure
If your faucet only leaks at certain times, high water pressure may be the cause. Excess pressure strains the faucet seal, causing intermittent dripping. Homes with older plumbing often develop this issue without warning.
If you’ve replaced basic washers and rings but the leak persists, deeper issues like deteriorated valves or clogged pipes may be to blame. All State Plumbing Pros can inspect your lines and determine the exact cause.
Before You Begin: Tools and Safety Steps
Repairing a leaky faucet requires a few basic tools, but preparing your workspace is just as important. Clearing access under the sink, covering surfaces with a towel, and organizing small parts prevent mistakes.
Before you start, dry the area and make sure you can clearly reach the shut-off valves. If valves are stuck or broken, avoid forcing them and call a professional.
Essential Tools
Before starting the repair, gather these tools:
- Adjustable wrench
- Flathead and Phillips screwdriver
- Allen wrench for handle screws
- Needle-nose pliers
- Replacement O-rings, washers, or cartridges
- Plumber’s grease
- Towel or soft cloth
- Small tray to hold screws, rings, and springs
Safety Steps
Follow these steps to protect your faucet and prevent accidents:
- Turn the water supply off using the shut-off valves.
- Open the faucet to relieve pressure and drain excess water.
- Plug the drain so screws and small parts don’t fall in.
- Place a towel in the sink to protect the finish.
- Take photos of the internal components during each stage so you can reference them during reassembly.
How to Fix a Leaky Faucet (Step-by-Step Guide)
Most faucets can be repaired in an hour or less. Follow each step carefully to avoid damaging internal components or misaligning parts.
Step 1: Turn Off the Water Supply
Locate the shut-off valves beneath the sink and rotate them clockwise. If your home doesn’t have shut-off valves under the fixture, turn off the main water supply.
Relieve residual water pressure by opening the faucet.
Step 2: Remove the Faucet Handle
Most handles have a decorative cap hiding a screw. Gently pry the cap off with a screwdriver, then unscrew the handle using an Allen wrench or standard screwdriver. Lift the handle straight up.
Step 3: Identify Your Faucet Type
Determining the type of faucet helps you pick the right replacement parts:
| Faucet Type | How to Identify | Leak Location | Typical Fix |
|---|---|---|---|
| Compression Faucet | Two handles for hot/cold | Drips from the spout | Replace washer & O-ring |
| Cartridge Faucet | One or two handles | Weak water flow/drips | Replace cartridge |
| Ball Faucet | Single handle with round cap | Leaks near the handle | Replace the ball assembly |
| Ceramic Disc Faucet | Wide single handle | Spout leak | Replace the disc or the full assembly |
Step 4: Inspect Internal Components
Carefully remove screws and internal parts using a wrench or needle-nose pliers. Look for:
- Cracked or flattened washers
- Split or dried-out O-rings
- Worn cartridges
- Corroded valve seats
- Mineral buildup is restricting water flow
The goal is to identify why the faucet isn’t sealing correctly.
Step 5: Replace Damaged Parts
Purchase a matching new washer, O-rings, or cartridge from a hardware store. Bringing your old parts with you ensures the correct fit.
Apply plumber’s grease on the new O-ring to improve movement and prevent early wear. Reinstall parts in the same order you removed them; your reference photos help here.
Step 6: Reassemble and Test
Once everything is back in place, turn on the water supply. Watch for leaking at the spout, base, or faucet handles. Adjust the screws if the drip continues. If the leak persists, the faucet may have deeper mechanical issues, such as a worn valve seat or hidden corrosion.
When to Call a Professional Plumber
DIY repairs can solve many faucet problems, but some issues require specialized tools or deeper inspection. If the faucet leak worsens after repair attempts or you notice moisture under the sink, warped wood, or persistent dripping, contact a plumber immediately.
Call for professional help if:
- The shut-off valves are stuck or corroded
- There is visible corrosion around the faucet base
- The leak returns within days
- The faucet requires parts you can’t replace easily
- You suspect high water pressure or clogged lines
- Water is leaking under the sink and damaging the cabinets and the flooring
All State Plumbing Pros is available for 24/7 faucet repair, leak detection, and emergency plumbing for homes in Connecticut and Westchester County.
How to Prevent Future Faucet Leaks
Preventing a leaky faucet starts with regular maintenance. Small habits help protect your faucet’s internal components and keep your plumbing working efficiently.
Inspect your faucet every few months. Check for loosened handles, mineral buildup on the aerator, or stiff motion when adjusting temperature. Clean the aerator to remove sediment and maintain a strong water flow. Tighten any screws that feel loose.
Checking your home’s water pressure can also prevent leaks. Excessive pressure strains seals, washers, and cartridges, leading to premature wear. Consider installing or adjusting a pressure regulator if leaks continue to develop.
Conclusion
Fixing a leaky faucet is one of the simplest ways to protect your home and save money on your water bill. By replacing worn washers, O-rings, or cartridges, you can restore consistent water flow and prevent long-term damage. However, when leaks continue, valves won’t move, or fittings show signs of corrosion, DIY methods may not be enough.
If your leaky faucet keeps dripping no matter how many times you tighten or replace parts, it may be time for a professional repair. At All State Plumbing Pros, our licensed plumbers are available 24/7 across Connecticut and New York to handle faucet repairs, fixture replacements, and full plumbing diagnostics. Whether you’re dealing with water damage, rising water bills, or an aging fixture, contact us today for fast, reliable service you can trust.
FAQs
How do I stop a faucet from dripping?
To stop a faucet from dripping, shut off the water, remove the handle, and inspect the washer, O-ring, and cartridge. Replace any worn parts, reassemble the faucet, and test the water flow. If the drip continues, the issue may be related to the valve seat or water pressure.
How to fix a leaking faucet step by step?
Turn off the water supply, remove the faucet handle, identify your faucet type, inspect the internal parts, and replace damaged components such as washers, O-rings, or cartridges. Reassemble the faucet and test for leaks. If the leak persists, calling a plumber ensures the problem is resolved correctly.
What is the most common cause of a leaky faucet?
The most common causes are worn-out washers, cracked O-rings, damaged cartridges, and corroded valve seats. These issues prevent the faucet from sealing fully, allowing water to leak through even when the handle is off.
How do I stop my tap from dripping?
Inspect the faucet’s internal components and replace worn parts like washers or O-rings. If you have a ball faucet, replacing the ball assembly may be necessary. If you cannot stop the drip or the faucet is heavily corroded, contacting a plumber is the safest option.
Priming a Well Pump: Step-by-Step Guide for CT Homeowners
A loss of water pressure can disrupt everything from morning showers to basic cleaning, and one of the most common reasons is a well pump that has lost its prime. For many homes across Connecticut and Westchester County, a well water pump is the heart of the water system, quietly keeping a steady water supply moving from underground into the house. Most people only think about priming a well pump when the water suddenly stops flowing and the pump runs but cannot pull water.
When a pump loses prime, air enters the pump housing, pump casing, or suction line and blocks the vacuum that normally pulls water up from the well. Instead of water flowing through the water line, the pump spins against air pockets and trapped air, which can quickly lead to overheating and damage. This problem is especially common in shallow wells and older systems in towns like Danbury, New Milford, Ridgefield, Wilton, and across Westchester County, where seasonal changes and aging piping create more risk of leaks.
This step-by-step guide explains what priming is, how to safely fill the pump and get the pump system successfully primed, what the common causes of a lost prime are, and when it’s safer to call a licensed plumber instead of trying to re-prime the pump again. If you are dealing with low or no water pressure, unusual noises from the pump, or a pump that won’t hold prime, All State Plumbing Pros offers 24/7 well pump repair and well pump service throughout Fairfield County and Westchester County.
What Priming a Well Pump Means
Priming a well pump means filling the pump body, pump, and suction line, and sometimes the suction pipe, with water so the pump can create enough vacuum to pull water from the well. Jet pumps, especially shallow well pumps, rely on water inside the casing to generate pressure and start water flow. Without water inside the pump, the impeller just spins against air, and the pump cannot function correctly or build pressure.
In a typical pump system, jet pumps sit above ground near the pressure tank, while submersible pumps are installed below the water level inside the well. Most submersible pumps are self-priming because they are already submerged, but the plumbing and water pumps above ground can still develop air leaks and lose pressure. Jet pump systems, on the other hand, need proper priming anytime the suction line is opened, drained, or exposed to air.
Priming is often necessary after a pump has been shut off for maintenance, after a power outage, when foot valves or check valves fail, or when loose fittings allow air into the piping. When you go through the priming process correctly, you’re refilling the pump and water line, so the pump starts with water in place, instead of air, and your system can function correctly again.
Signs Your Well Pump Needs Priming
A pump rarely fails without sending a few warning signs first. Recognizing these signals early can help you avoid burnt motors, damaged pressure tanks, and expensive pump repair. When priming is needed, the pump usually struggles to keep a steady water supply, and you’ll notice changes in how water flows through your fixtures.
One of the first signs is losing pressure at faucets and showers. Water may start strong and then fade, or you might see air bubbles and sputtering at the faucet when you turn it on. The pump runs for longer periods, sometimes constantly, but the water flow inside the house stays weak or stops altogether. You may hear unusual noises from the pump or piping as air moves through the system. The pressure gauge may refuse to climb, bounce around, or drop back down quickly after the pump shuts off.
These problems often appear in older, well pumps and shallow wells around Connecticut and Westchester. If you’re noticing any of these signs, a priming pump attempt may help, but it’s important not to run the pump dry for long. If you’re unsure what is causing the issue or how to fix it, All State Plumbing Pros can inspect the system, find air leaks or worn components, and restore safe water pressure before the pump is damaged.
Why Well Pumps Lose Prime
A properly installed pump system holds prime because the suction side stays full of water and free from air. When air enters the suction pipe or water drains back into the well, the pump loses its ability to pull water. Understanding why this happens makes it easier to prevent future problems and know when DIY attempts may not be enough.
Air Leaks in the Suction Line
Even a small crack, loose fitting, or tiny gap in the suction line can prevent proper priming. As the pump runs, air is drawn into the line through loose fittings, joints, or small holes in the piping. Instead of water flowing up from the ground, air pockets interrupt the vacuum. Over time, PVC piping can become brittle, and buried lines can shift with frost and soil movement, especially in New England climates.
Faulty Foot Valve or Check Valve
A foot valve at the bottom of the suction line is designed to hold water inside the pipe after the pump shuts off. A leaking foot valve or worn check valve allows water to slowly drain back into the well. When you try to restart the pump, the entire suction side is filled with air instead of water. This is one of the most common causes of a lost prime in older wells.
Low Water Level or Dry Well
Seasonal drought, heavy irrigation, or overuse can lower the water level in shallow wells. If the pump intake ends up above the water level, air is drawn in instead of water. Running a pump dry can damage internal parts and shorten the life of the motor. In some cases, the pump will need professional adjustment or replacement to reach deeper water or protect the system.
Debris or Blockages
Sediment, sand, and debris can build up in the suction line and pump casing, restricting flow and making pump priming more difficult. Clogged intake screens or valves can act like partial blockages. When the priming process doesn’t clear these obstructions, the pump may struggle, short-cycle, or lose pressure quickly.
Pressure Tank and System Issues
A pressure tank that isn’t charged correctly causes rapid cycling, which puts extra strain on the pump and increases the risk of air being drawn into the system. The pressure switch that tells the pump when to turn on and off can also malfunction. When these controls are out of balance, the pump runs more frequently and is more likely to lose prime.
Long Periods of Inactivity
Vacation homes or little-used properties often lose prime simply from sitting idle. Over time, water can drain back into the well, allowing air to fill the suction side. When the pump started after months of downtime, the system may need a full re-prime before it will operate reliably.
Safety Steps Before Priming a Well Pump
Working on a pump involves electrical power, water, and pressurized piping, so safety needs to come first. Before you begin any pump priming or plumbing work, make sure you’ve created a safe environment and eliminated obvious hazards.
Start by turning off the power at the breaker panel so the pump can’t start while you’re working on it. Double-check that the pump has shut off completely and no parts are still moving. If your pump is in a damp area, verify that there is no standing water around electrical components. Wear gloves and safety glasses to protect against splashing and sharp edges.
Next, visually inspect the pump housing, priming port, and nearby piping. Look for cracks, corrosion, or leaks around fittings, relief valves, and joints. If you suspect damaged wiring or see signs of burning, stop and call a professional. Confirm that your well cap is secure and that the system has access to enough water. These simple steps help ensure the priming process is safe and effective.
How to Prime a Well Pump (Step-by-Step Guide)
Priming a well pump is all about restoring water inside the pump and the suction side so the system can build pressure again. While the details vary slightly between models, most jet pumps and shallow well pumps follow a similar process. If you move slowly and regularly clean any debris, you can often get the pump primed without damaging any components.
Step 1: Turn Off Power
Begin by switching off the pump at the breaker panel. This cuts electrical power to the pump motor and prevents it from running dry while you work. Make sure the pump has stopped completely before you move on.
Step 2: Access the Priming Port
Locate the priming port or priming plug on top of the pump housing or pump casing. You may need a wrench or screwdriver to remove it. Carefully loosen and remove the plug so you can access the inside of the pump body. Set the plug and any washers aside where you can easily remove dirt before putting them back.
Step 3: Fill the Pump and Suction Line With Clean Water
Using a garden hose or a clean bucket, slowly begin filling the pump through the priming port. You want to use clean water so you don’t introduce debris into the pump system. Continue filling the pump until the pump housing and suction pipe are filled and water starts to overflow from the opening. This step helps push out air pockets that prevent proper priming. If water quickly drains away, it may indicate a leaking foot valve or a larger leak down the suction line.
Step 4: Replace the Priming Plug and Restore Power
Once the pump and suction line are filled, reinstall the priming plug securely. Make sure the plug and fittings are snug so new air leaks don’t form. Then go back to the panel and restore power. Watch and listen as the pump started. A primed pump should build pressure on the gauge, move water through the system, and then shut off when the pressure switch reaches its cut-off setting.
Step 5: Double Check Performance and Re-Prime if Needed
If the pressure gauge refuses to climb, the pump runs continuously, or you still hear air moving through the system, you may need to reprime the pump. Repeat the filling the pump step and check for any visible air leaks or loose fittings that could prevent proper priming. If the pump runs hot, loses pressure quickly, or never reaches normal pressure, it’s a sign that deeper pump repair, valve work, or suction line service is needed.
If you’re not comfortable working around electrical components or if repeated priming doesn’t restore normal water flow, All State Plumbing Pros can inspect the pump, pressure tank, valves, and piping to fix the root cause and protect your system from further damage.
Troubleshooting a Well Pump That Won’t Prime
When a pump refuses to stay primed, it usually indicates an underlying issue that simple priming won’t fix. Repeated attempts without success can overheat the motor and stress other components like the pressure tank and piping. It’s helpful to look at the overall system and match symptoms with likely causes.
Here is a quick troubleshooting overview:
| Symptom | Likely Cause | What Homeowners Can Check | When to Call a Pro |
|---|---|---|---|
| The pump won’t build pressure | Air leaks or loose fittings | Tighten fittings and check above-ground piping | If pressure still drops or the pump overheats |
| The pump needs priming repeatedly | Leaking foot valve or check valve | Listen for water draining back into the well | Valve or suction line replacement |
| No water at all | Low water level or dry well | Pause use and allow the well to recover | If water remains low or the pump runs dry |
| Pump cycles rapidly | Pressure tank or pressure switch issue | Check tank pressure and visible wiring | Tank service, control repair, or replacement |
| Water surges or sputters at the faucet | Air pockets in the suction line | Inspect for air leaks, loose joints | Persistent air requires professional pump repair |
In older pump systems around Connecticut and Westchester, buried suction lines and aging valves are common failure points. Small air leaks and failing foot valves can be hard to diagnose without testing equipment. If your pump cannot stay primed, it’s wise to have a licensed professional evaluate the system and recommend a long-term fix instead of risking damage with repeated DIY attempts.
How to Prevent a Well Pump From Losing Prime
Preventing a loss of prime comes down to keeping air out of the suction side and protecting sensitive components. With regular care, most pumps can run for years without needing frequent priming. A little maintenance can go a long way toward keeping water flowing and avoiding emergencies.
First, keep an eye on your water pressure and listen for changes in how the pump runs. If the pump runs longer than usual or starts and stops rapidly, it may be a sign that air is entering the system or the pressure tank is not working correctly. Inspect accessible piping for corrosion or leaks and repair any damp spots around joints before they expand.
Next, maintain the valves that hold water in place. Worn foot valves and check valves are a leading cause of lost prime, so replacing them as they age can prevent the suction line from draining back into the well. Keeping the well cap secure and the area around the well head clear of debris also protects the system. For homes with shallow wells, make sure the pump is properly sized to the depth so it doesn’t struggle when water levels drop.
Finally, consider a routine service schedule. Having a professional regularly clean filters, test the pressure tank, inspect the pressure switch, and check for underground leaks helps ensure your system stays stable year-round. All State Plumbing Pros offers preventive well pump service and plumbing maintenance to help homeowners in Fairfield County and Westchester County avoid surprises and keep their systems functioning smoothly.
When to Call a Professional in Connecticut or Westchester
While many homeowners can handle basic priming, not every well pump issue is safe or practical to tackle alone. Sometimes the safest option is to turn the pump off and call for professional pump repair before further damage occurs.
You should contact a licensed plumber if the pump won’t hold prime after several careful attempts, the pressure gauge drops right after the pump shuts off, or the motor becomes hot or emits burning smells. Other red flags include persistent air in the water, muddy or sandy water flowing from faucets, or a system that trips breakers when the pump turns on. Any of these signs can indicate deeper problems in the electrical, mechanical, or plumbing systems supporting your well.
Homes throughout Fairfield County, CT, and Westchester County, NY often rely on older wells and pumps that require expert attention to stay reliable. All State Plumbing Pros provides 24/7 emergency service, including diagnostics, pump replacement, suction line repair, and pressure tank service, so you don’t have to guess at the problem or risk damaging your equipment.
Conclusion
Priming a well pump is essential for keeping your home’s water system reliable and maintaining steady water pressure. A pump can lose its prime due to air leaks, a failing foot valve, low water levels, or aging pipes. Understanding how priming works, and the warning signs to watch for, helps you respond quickly and prevent costly damage. For many homeowners in Fairfield County, Connecticut, and Westchester County, New York, well pumps and shallow wells are part of everyday life, so keeping them in good condition is critical.
If your well pump keeps losing pressure, won’t stay primed, or has stopped pulling water altogether, it’s time for expert help. At All State Plumbing Pros, our licensed technicians provide 24/7 well pump repair, priming, and replacement services across Connecticut and New York. Whether you need emergency diagnostics, suction line repair, or a full system upgrade, contact us today for fast, reliable water solutions you can count on..
FAQs
How do you prime a well water pump?
To prime a well water pump, first turn off the power at the breaker and remove the priming plug on top of the pump housing. Use a hose or bucket to slowly fill the pump and suction line with clean water until they are filled and water overflows. Replace the plug, restore power, and watch the pressure gauge; if the system doesn’t build pressure or water flowing to fixtures is still weak, you may need to reprime or have the system inspected.
How do I get my prime back on my well pump?
You can get your prime back by refilling the pump casing and suction side with water and eliminating air leaks that prevent proper priming. Check accessible fittings, valves, and piping for damp spots, loose joints, or obvious cracks. If you still can’t keep the pump primed or the pump runs without building pressure, homeowners in Connecticut and Westchester can schedule professional well pump repair with All State Plumbing Pros for a long-term solution.
How long does it take for a well pump to prime?
In most cases, a jet pump should be successfully primed within a few minutes once the pump housing and suction pipe are filled with water. After you restore power, the pump should build pressure and then shut off normally. If the pump runs continuously, makes unusual noises, or fails to reach the normal pressure range, there may be deeper issues such as a low water level, a leaking foot valve, or air leaks in the suction line that need professional attention.
What is the process of priming a pump?
The process of priming a pump involves removing trapped air from the suction side and filling the pump body and suction line with water so the pump can create a vacuum and pull water from the well. This includes turning off electrical power, accessing the priming port, filling the pump with water, reinstalling the plug, and then turning the power back on to test the system. If this process doesn’t restore normal operation, it’s a sign that components like valves, piping, or controls may need repair or replacement.
Well Pump Lifespan: How Long They Last
A well pump is the unsung hero of your home’s water system. It quietly pulls fresh water from underground aquifers and delivers a consistent supply to your faucets, showers, and appliances every day. Because the well pump operates behind the scenes, many homeowners don’t think much about how long a well pump lasts until they notice low water pressure, strange noises, or a sudden decrease in flow. (more…)
Deep Well Pump vs Shallow Well Pump Comparison
If your home relies on a well for a clean water supply, choosing between a deep well pump and vs shallow well pump is one of the most important decisions you’ll make for the health of your plumbing system. The right pump system affects everything from water pressure, energy efficiency, and flow rates to how your home performs during dry seasons. (more…)
Complete Well Pump Maintenance Guide for Homeowners
A dependable well pump system ensures your home’s water supply stays clean, steady, and reliable year-round. Without regular well pump maintenance, small issues like corrosion, mineral buildup, or faulty wiring can lead to major system failures that disrupt your access to drinking water. Proper pump maintenance keeps every component, from the pressure tank to the pressure valve, working efficiently and safely. (more…)
Top Signs of Well Pump Failure Every Homeowner Should Know
A properly functioning well pump keeps your home’s water system running smoothly, supplying consistent water pressure, clean water, and steady flow. But when parts like the pressure tank or pressure switch start to wear down, you may notice low water pressure, air spurts, or strange noises from the plumbing system. Recognizing the early signs of well pump failure can help prevent costly repairs and keep your water flowing safely. (more…)